
Preparing Your Garage for Cable Replacement Services

Have you ever come home from a long day at work, hit the garage door opener, and watched your garage door stop halfway, tilted at an angle? That’s what happened to one of our customers in Longview, TX. Mr. Johnson noticed that one side of his garage door was hanging lower than the other and wouldn’t budge. He called Longview Garage Doors, and our team found a snapped garage door cable. With professional help and the right tools, we replaced the old cable, checked the garage door springs and pulley system, and had his door operating smoothly the same day.
According to the U.S. Consumer Product Safety Commission, over 20,000 injuries occur annually due to garage door accidents. Many of these incidents are caused by worn or broken cables, which are vital components in any garage door system. These cables, along with torsion springs and drums, carry the massive weight of the door during operation. When a cable snaps, the door can become dangerously unstable, posing risks not only to property but to personal safety as well.
If you’re preparing for a garage door cable replacement, you might be wondering what steps you need to take before the technician arrives. Good preparation ensures the process goes smoothly, protects your home, and keeps your family safe. This guide offers a comprehensive, step-by-step approach to getting your garage ready, so your garage door system can return to safe operation quickly and efficiently.
What Are Garage Door Cables and Why Are They Important?
Garage door cables are strong metal wires that work with your garage door springs and drums to lift and lower your door. These cables are typically part of a torsion spring system and attach to the bottom brackets at the base of your garage door. As the door opens, tension from the torsion springs causes the cables to wrap around the cable drum, lifting the door. When you close the door, the cables unwind, lowering it gently.
Why Cables Matter
- Balance: Cables keep the door balanced on both sides, ensuring it opens and closes evenly. Without this balance, one side may rise while the other sticks, straining the entire system.
- Safety: Without cables, the door could fall unexpectedly, damaging your property or injuring someone nearby. Proper cable operation is critical to safe function.
- Smooth Operation: Cables, drums, and pulleys allow for a smooth, quiet operation of your garage door system, making everyday use safe and hassle-free.
Cable Types and Materials
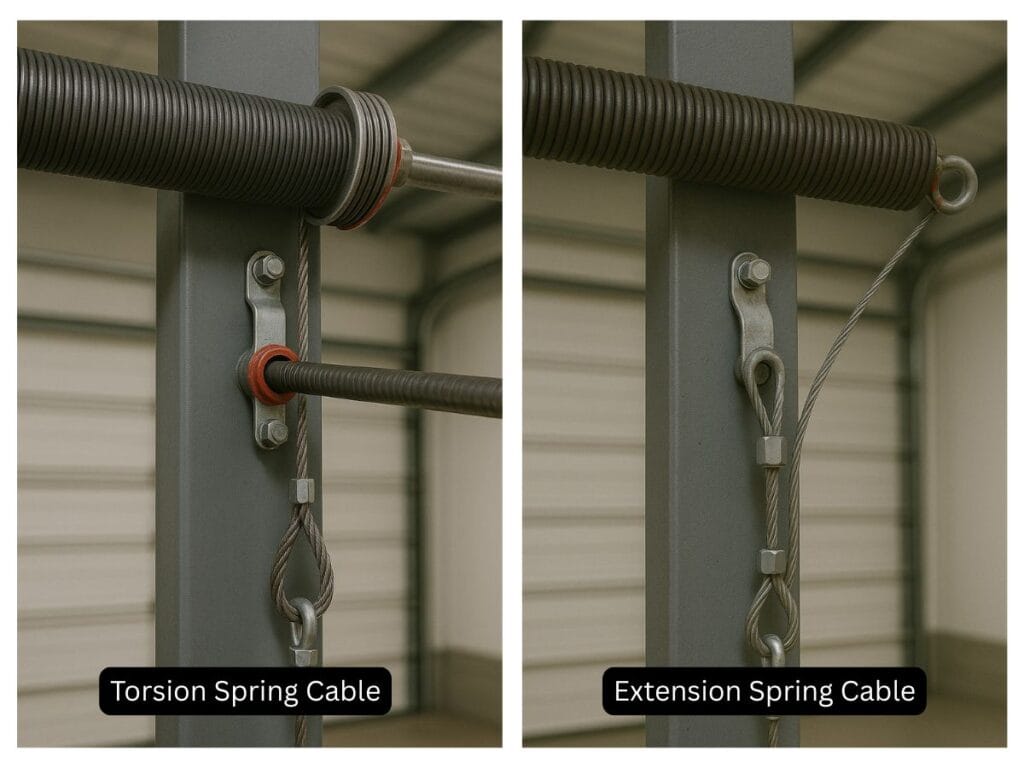
Garage door cables are generally made from galvanized steel, providing rust resistance and high tensile strength. Common types include:
- Torsion spring cables: Found in most residential systems.
- Extension spring cables: Used in older setups or lighter doors.
Over time, garage door cables can wear out due to constant tension, friction, poor lubrication, and environmental factors like moisture and rust. When they begin to fray, corrode, or stretch, their ability to manage the door’s weight becomes compromised, leading to risky operation.
Signs That You Need a Garage Door Cable Replacement
Recognizing the warning signs of a worn or broken cable can help you avoid larger, more costly repairs. A proactive approach can prevent emergencies and maintain the safe operation of your garage door system.
1. Uneven Door Movement
If one side of the garage door lifts faster than the other or sags visibly, it’s a clear sign that one of the door cables has slipped from its drum or snapped. This creates an imbalance, forcing other parts like the torsion springs and drums to work harder, which can cause additional damage.
2. Loud Noises During Operation
A sudden snap, clunk, or banging sound can indicate a broken cable or the release of spring tension. If you hear something unusual, stop using the door and call a professional immediately.
3. Frayed or Rusted Cables
Inspect along the sides of the door tracks for any cables that appear worn, rusted, or frayed. Over time, cables can corrode, especially in humid or wet environments. Frayed wires are a major safety risk.
4. Door Stops Midway or Gets Stuck
A broken cable may cause the door to become jammed or halt halfway. This puts undue stress on the opener and can damage the track or rollers.
5. Heavy or Difficult to Lift Manually
If your garage door feels unusually heavy when lifted manually or fails to stay open, this may be due to faulty cables or reduced spring tension. This can be hazardous and should be addressed promptly.
6. Worn Bottom Brackets or Drums
If the bottom bracket appears loose, worn, or bent, or if the cable drum shows signs of cracking or slippage, the entire system could be at risk.
Ignoring these signs can lead to further damage to the pulley system, drums, torsion tube, or garage door springs, requiring more extensive and expensive repairs.
Safety First: Essential Precautions Before Cable Replacement
Garage door cable replacement involves high-tension components such as torsion springs, drums, and pulleys. Handling these without the proper experience, tools, and safety gear can result in serious injuries or property damage.
Safety Steps Before the Technician Arrives
- Clear the area: Keep children, pets, and bystanders away from the garage door and work area.
- Unplug the opener: Disconnect power to the garage door opener to prevent accidental activation.
- Do not operate the door: Avoid trying to open or close the door, especially if one cable is already damaged or broken.
- Refrain from DIY inspections: Avoid tampering with the spring tension, bottom brackets, or pulley system. These components require expert handling.
- Use PPE if observing: If you wish to monitor the situation closely, wear proper personal protective equipment (PPE), including safety glasses and gloves.
Professional garage door technicians are trained to perform cable replacements safely and efficiently. They use the right tools, understand tension physics, and follow industry best practices for safety.
Step-by-Step Guide: Preparing Your Garage for Cable Replacement
Proper preparation makes the repair process quicker, safer, and more efficient. Here is a detailed, step-by-step guide to getting your garage ready for cable replacement services:
Step 1: Clear the Work Area
Move vehicles, bicycles, storage bins, tools, and equipment out of the garage or at least several feet away from the door. Ensure the technician has plenty of room to move freely around the garage door system.
Step 2: Provide Easy Access
Unlock all doors and gates leading to the garage. If you’re not available during the scheduled repair time, arrange access via a neighbor, smart lock, or spare key.
Step 3: Improve Lighting and Ventilation
Ensure the garage has adequate lighting for the technician to inspect the system. Open windows or turn on fans for airflow, especially during warm Texas summers.
Step 4: Protect Belongings
Cover or relocate items that may be sensitive to dust or debris. If possible, use plastic sheeting to shield storage shelves near the garage door.
Step 5: Communicate Any Prior Issues
Let your technician know about past problems with the garage door, including strange noises, difficulty operating, or previous DIY repair attempts. This information helps ensure a more accurate diagnosis and long-term repair.
What to Expect During the Cable Replacement Process
A typical garage door cable replacement by a professional follows a precise process that ensures the safety, function, and longevity of the door system.
Step 1: Full System Inspection
The technician inspects the garage door system, including cables, drums, torsion springs, rollers, bottom brackets, and garage door opener. Any signs of wear or misalignment are noted.
Step 2: Disconnect Power and Release Tension
The technician disconnects the opener and releases spring tension using winding bars and other specialized tools. This prevents injury and allows safe removal of components.
Step 3: Removal of Old Cables
Damaged or worn cables are unspooled from the cable drums and detached from the bottom brackets. The technician checks for rust or damage on adjacent components.
Step 4: Installation of New Cables
High-quality galvanized cables are installed, secured at the bottom brackets, and properly wound around the cable drums. Tension is carefully reapplied to maintain balance.
Step 5: Balance and Alignment
Spring tension is fine-tuned, the opener is reconnected, and the door is tested through multiple open-close cycles to ensure smooth operation.
Step 6: Final Safety Check
The technician checks the tightness of all bolts, setscrews, and brackets. They also inspect the pulley system, torsion springs, and opener for final calibration.
Common Mistakes to Avoid
Understanding what not to do is just as important as knowing how to prepare. Here are common errors homeowners make:
- Using makeshift tools: Household tools can strip bolts or cause incorrect adjustments.
- Only replacing one cable: Always replace both cables to ensure balance and longevity.
- Ignoring spring wear: Worn torsion springs must be inspected and possibly replaced during cable replacement.
- Skipping rebalancing: A misaligned door strains the opener and can lead to failure.
- Attempting DIY without training: Without proper skills and PPE, you risk injury and further damage.
How Often Should Garage Door Cables Be Replaced?
Garage door cables have a lifespan of 7 to 10 years, though this can vary. Some factors that shorten cable lifespan include:
- Frequent use: High daily usage wears out parts faster.
- Exposure to moisture: In humid environments, cables can corrode.
- Lack of maintenance: Friction from dirt and rust accelerates cable failure.
- Worn companion parts: Old pulleys or drums can fray new cables quickly.
We recommend biannual checks and annual professional inspections for signs of wear, especially if your system is aging or heavily used.
Maintenance Tips After a Cable Replacement
Lubricate All Moving Parts
Lubricate rollers, hinges, pulleys, springs, and cables using silicone or lithium-based garage door lubricant every 3 to 6 months. Proper lubrication reduces friction and wear.
Conduct Monthly Visual Inspections
Look for rust, sagging cables, bent brackets, or dirty tracks. Regular checks catch problems early.
Clean Tracks and Surrounding Areas
Sweep and vacuum the tracks and clear any debris or buildup. Avoid using water, which may corrode parts.
Perform Manual Door Tests
With the opener disconnected, lift the garage door manually. It should move smoothly and stay halfway open. If not, call for rebalancing.
Schedule Preventive Maintenance
Have your garage door inspected annually by a professional. Preventive maintenance reduces the risk of emergency repairs and extends the system’s lifespan.
Why Choose a Professional Garage Door Service?
Choosing a professional repair service ensures your garage door system functions properly and safely. Here’s why Longview Garage Doors stands out:
- Expert Technicians: Certified, trained, and experienced in handling all garage door models and components.
- Top-Quality Parts: We use durable, corrosion-resistant cables, drums, and springs for long-lasting performance.
- Comprehensive Services: From cable replacement to full system overhauls, we handle it all.
- Local Reliability: Based in Longview, TX, we’re your neighbor and your trusted garage door expert.
- Customer-Centric Approach: Clear communication, honest pricing, and satisfaction guaranteed.
Final Thoughts
Your garage door is more than just an entry point, it’s a vital part of your home’s function and security. Ensuring that your cables, springs, pulleys, and opener work together in harmony helps avoid dangerous accidents and inconvenient breakdowns.
Preparation, knowledge, and timely professional intervention are the keys to maintaining a safe, reliable, and efficient garage door system. If you’re seeing signs of wear, don’t wait until it’s too late. Take action now to prevent more costly repairs in the future.
With Longview Garage Doors, you’re choosing a team committed to excellence, safety, and your peace of mind.
How Can Longview Garage Doors Help You?
Is your garage door stuck, sagging, or making unusual noises? It might be time for a professional garage door cable replacement.
At Longview Garage Doors, we specialize in safe, efficient, and affordable garage door services for both residential and commercial properties. Our technicians are trained to work with all garage door systems, including torsion spring setups, cable drums, bottom brackets, and pulley systems.
We proudly serve the Longview, TX community and surrounding areas with integrity and skill. Whether it’s a routine repair or emergency garage door service, we have the tools, parts, and experience to get the job done right.
✉️ Visit us at:
106 Village Dr, Longview, TX 75605
📞 Call now to schedule service:
(430) 227-7005
Book Online HERE.
Trust Longview Garage Doors to restore your garage door to perfect working order, with safety, professionalism, and a commitment to your satisfaction.
Frequently Asked Questions (FAQs)
What happens if I continue using my garage door with a broken cable?
Using a garage door with a broken cable can cause further damage to the door system and pose a serious safety risk to people and property.
Are garage door cables covered under warranty?
This depends on the manufacturer or service provider, but many professional installations include a warranty for parts and labor. Check with your installer.
Can weather conditions affect garage door cable performance?
Yes, extreme cold, heat, and humidity can cause cables to expand, contract, or corrode, which can lead to premature wear and malfunction.
How do I know if my garage door cable is the right size?
The correct cable size is based on your garage door’s height, weight, and spring system—a professional can measure and select the proper cable for your setup.